![[Site Map!]](../images/gif/map.gif)
2003 Chrysler GT Cruiser Turbo (Deep Cranberry)
(a.k.a. "Zippy")
UPDATE: 4/21/08: This car WAS SOLD on Ebay
Update: 12/29/05
Christmas came and so did some new go-fast/handle better stuff for "Zippy!"
- Stage 1
- BTG Strut Tower Bar
- Hyperground Kit
The BTG Strut Tower Bar looks great and the instructions that come with it are also clear and helpful. We got the strut bar from the PTCruiserClubStore for about $240 and were very pleased with their friendly service.
We got a Sun Hyperground Kit (Type S Gold) for about $130 + shipping and after much scratching of heads and referring to a couple of helpful hints (here's one) on the 'Net, we got it installed.
The hyperground system DID NOT help AT ALL with our headlight and interior light flickering and also the variation that happens with the fan/blower speed.
We ran the hyperground from:
- the driver's side bolt on the BTG Strut Bar to the negative battery terminal,
- the negative battery terminal to the far left intake manifold bolt,
- from far left intake manifold bolt to the driver's side of the head,
- from next to far left intake manifold bolt to the passenger's side bolt on the BTG Strut Bar, and
- from the driver's side of the head to the transmission

Update: 07/02/04
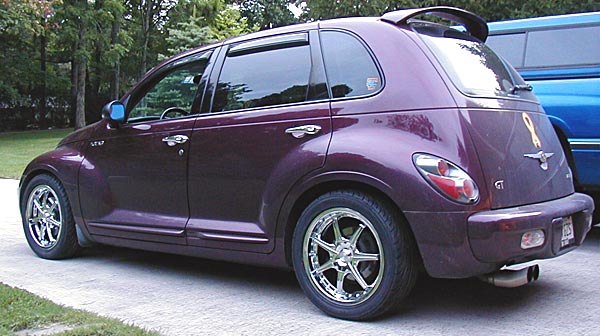
Zippy gets new shoes! - Click to see pictures
- MB Design "Shifter" (17x7.5) wheels and
- Goodyear Eagle F1 GS-D3 tires
Update: 02/21/04
I got a Progress Rear Sway bar for Valentine's Day from UltraRev (they seemed to have the best price at $131.50 + shipping (~$10)); My '03 PT Cruiser Turbo GT already had the holes drilled and threaded for a rear sway bar, but Chrysler chose to leave it off (even though it was listed separately on my window sticker), presumably as a cost-savings measure. Considering I paid close to $25,000 for this car, leaving off a $150 sway bar makes no sense!
I was expecting it to be a turquoise color, but mine is a dark battleship grey, which fits in well with Zippy's underside color scheme (black and dirt). The installation was basically plug and play and the instructions that came with the sway bar were basic and minimal, but this really is a pretty straightforward installation; it took us about an hour.
Check out the pics!
Update: 01/24/04
I installed a Cabin Air Filter for Zippy. My '03 PT Cruiser Turbo GT already had the airbox for a filter, but did not have the filter itself.
At PTDoitYourself.Net, they also discuss cabin air filters and installation techniques; not only Ma MoPar's, but also a Briggs and Stratton one, too. I decided to go with Ma MoPar's filter because it does not seem to choke the airflow like the B&S one apparently does.
I ordered a Cabin Air Filtration System from Dallas Dodge in Georgia for $10.50 + ~$5.00 shipping, but they don't seem to have them anymore. Check out this discussion on the PT Cruiser Forums about where to get them. The "System" comes with both the filter and the filter airbox. Since Zippy already has an airbox, it would have been nice to just be able to order the filter. Perhaps that can be done, since the filter was seemingly stamped with a Chrysler part number (05058040AA) and a Wix filter number, too (700602). I checked Wix's website, but couldn't find this particular filter.
Installation was pretty easy and took about 20 minutes. Check out the pics!
Update: 12/27/03
Got a new exhaust for Zippy! It's a Borla 2.5" 304 Stainless Steel Single Exhaust Dual Tip (part number 14926). We got it from Summit Racing for $470.
I decided to go with a single exhaust instead of dual because I understand with some dual exhausts, that the spare tire must be relocated. And I would have had to cut out the rear valence for the extra exhaust tip and I decided just to be simple.
It bolted right in, no problems. Check out the pictures!
First impressions of the exhaust tone at idle, while accelerating and at highway cruising speeds are good. Definitely more "throaty" than the stock exhaust at idle, but not too much, and has a nice "small explosion sound" under hard acceleration and the gears change (I have Autostick).
The biggest concern I had about getting an aftermarket exhaust was the exhaust tone at highway speeds, because in my previous daily driver, a '91 Eagle Talon Turbo AWD with a 2.5" Buschur Racing cat-back, it was sometimes difficult to talk or listen to music because of the exhaust noise at highway speeds. After installing the Borla system on Zippy, it looks like highway speed exhaust noise will be OK; if I have back seat riders, it may be difficult for them to talk, though.
The fit, form and finish of the Borla exhaust was great, and the dual tips look cool. They hang down kinda low, but that can be adjusted some by loosening the exhaust clamps and repositioning everything. It took hubby and me about an hour to do the removal/installation.
I'm hoping to be quicker and get better gas mileage with this new 2.5" exhaust!
Update: 11/08/03:
I've wanted "foldaway" power heated mirrors for some time to replace my stock power non-foldaway non-heated mirrors, so for my 11th wedding anniversary yesterday (11/7), I asked for and got a set of 2002 power heated "foldaway" mirrors. Not sure where hubby got them from, but in general, it seems they run ~$100/each. Part numbers: 4724657AD (left) and 4724656AD (right).
Installation was "plug and play," in that the 2002's mounted and electrically connected exactly like my 2003 power mirrors.
It took me about 45 minutes to remove and replace the mirrors with the new ones.
- First, the triangular interior cover on the door is removed to get access to the mirror fasteners by gently prying it until the two clips let go and the cover pops right off
- Next, the door panel must be loosened up to undo/make the electrical connection, but it does not have to be completely removed.
- Unscrew 3 phillips head screws from the perimeter of the door panel
- Unscrew 1 phillips head screw from behind the interior door release handle. Note that this screw is a different size (bigger) from the 3 screws around the perimeter
- Starting at the upper door panel where the triangular interior mirror cover was removed and moving down the front of the door, gently pull on the plastic door panel to release the (8) retaining clips
- Go ahead and undo the mirror electrical connector by swinging the door panel out at the bottom to access the connector near the front upper side of the door
- Use an 8mm deep socket to remove the 3 mirror fasteners
- Remove the mirror by gently grasping it and rocking it until it is loose
- Installation of new mirror is simply reversing the removal steps
Update: 09/13/03:
Got a MoPar BOV conversion kit (BOV = blow-off-valve, also know as the surge valve). WHOOOOSH! Allright!
I love the sound it makes when I'm under acceleration and let off the gas. It really sounds more like "PSSSSST" instead of "WHOOOOSH!"
This is not a new BOV, but a Ma MoPar BOV conversion kit that includes a nice anodized spacer, new gasket and three new screws/lockwashers (see below). You put the spacer and gasket inbetween the existing BOV and the turbo so that the BOV vents to atmosphere thru holes cut in the blue anodized spacer, instead of back in to the turbo inlet.
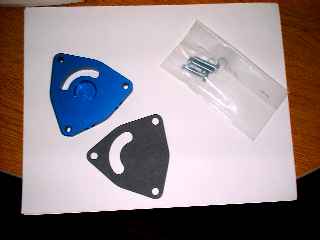
It's really a major PAIN to get the third screw in (it's on the passenger side). There is an oil line that runs right next to this screw and it's really hard to reach. I spent most of my 2 hours on this screw.
But, for me, it was worth it! I really like the sound. I used to have a '91 Eagle Talon Turbo AWD with a nice (stock) BOV and it made a nice sound, but this is better. A nice upgrade for ~$65!
Update: 09/05/03:
Zippy gets new taillights! I bought APC's 2nd generation carbon fiber taillights off of Ebay for ~$130 (from ProCarParts.com).
There have been general concerns expressed about APC taillights melting/fogging and other problems, but so far, my 2nd generation lights are doing OK.
Click here to see the new taillights!
Update: 03/03/03
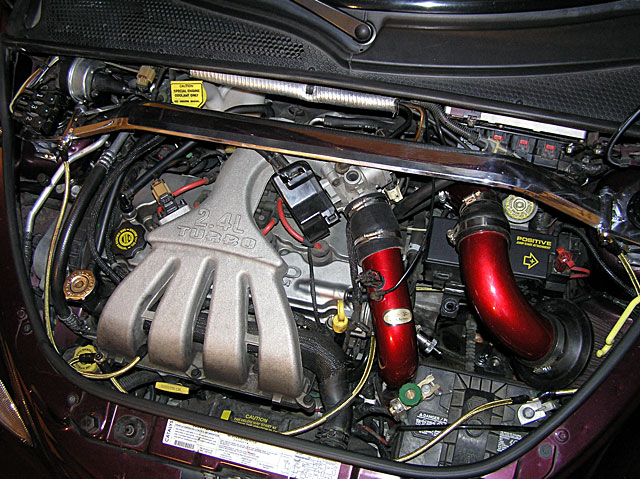
A couple of weekends ago, we put on a Street and Performance Electronics AirMax spiral flow intake system on Zippy. It comes with a K&N filter and is bright red!
Right off the bat, the car sounds MUCH better. The factory airbox includes a silencer which, in my opinion, does its job all too well. Not sure about the advertised "up to 20 horsepower" gain, but Zippy does feel stronger.
We took pictures as we installed the AirMax system: click here to check them out.
Update: 01/10/03
We finally got to put on the Eibach Pro-Kit lowering springs today and then got the car aligned. The Pro-Kit lowers by 1.6" in the front and 2.0" in the rear. Click to see the before and after pics!
Update: 01/08/03
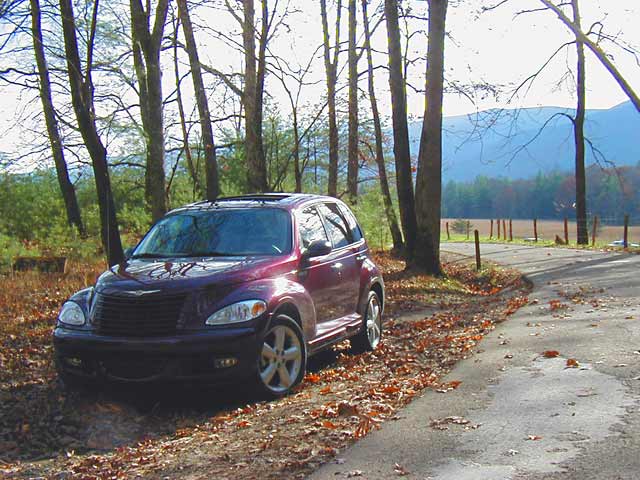
"Zippy" at Cade's Cove near Gatlinburg, TN

Impressions after 2+ months and ~3400 miles of driving:
- I LIKE IT!
- I named her Zippy, after "Zipporah," the wife of Moses
- Looks good, drives well, I'm pleased overall.
- Has a good ROAR when I step on it!
- I've already changed the oil to Mobil1 synthetic with a Mobil1 filter
- The headlights and foglights are great - really light up the road well.
- The power sunroof has worked flawlessly.
- But when the sunroof is open, even though there is a small built-in air deflector, the air inside the car vibrates and hurts my ears, so I have to crack open my side window.
- I'm already used to reaching for the power window switches which are located in the center of the dash instead of on the doors.
- Brought home a 32" TV without having to take the rear seats out! (But had to take the TV out of the box). We just flipped the rear seats up.
- Gas mileage (~20mpg city, ~21mpg highway) is disappointing. My '91 Eagle Talon Turbo AWD 300hp 4 cylinder gets ~25mpg!
- There's a rattle near the driver's side dash speaker
- The radio should stay on when I turn off the car
- The interior and exterior lights flicker slightly when I apply the brakes
- The transmission (auto) seems to shudder at low speeds when changing gears
- When I'm really accelerating, the tranny will not change gears from 3rd to 4th when I'm in Auto-Stick mode. I have to let off the gas and "click" it to 4th again.
- But still, overall, I LIKE IT! :)
Update: 10/26/02:
It's HERE! Click here for (way too many) pics of my new 2003 Deep Cranberry PT Cruiser "GT" Turbo
Update: 10/18/02:
It's on its way!!! Right now, it's made the trip from Toluca, MX to Laredo, TX to New Orleans, LA in a railcar on its way to Lawrenceville, GA (outside of Atlanta). From there, I assume it will be put on a truck. Hopefully, it will get here in about a week. Hopefully!
Update - 08/31/02
Click here to see the PT Turbo video that I made!
Our salesperson, Margie Romagnolo, called to say that we may be scheduled for an October build date, which usually means it'll be delivered ~one month later. So, we're probably looking at November for delivery. I've waited this long, I can certainly wait longer!
Besides, this will give me some more time to pick out some neat 18" wheels for my PT Turbo...
On 08/10/02, we went to Rice Chrysler on the Airport Motor Mile near Knoxville, TN and ordered a 2003 Cranberry GT Cruiser Turbo (or PT turbo, whatever). Don't know when it will be in yet!
Our salesperson, Margie Romangnolo, was helpful and knowledgeable. If you choose Rice, choose Margie.
We paid MSRP, $24,605, no more, no less. I was satisfied with that.
Options:
- 4 speed automatic
- Seat - Power Height Adjuster, Driver
- Radio - AM/FM Cassette, CD
- Moonroof - Power Express Open
- Air Bags - Side Supplemental
The test drive of one of the two PT Turbos that had just been delivered to Rice Chrysler proved fun and comfortable. The Auto-stick was easy to learn and use (we were familiar with it after renting a 300M to vacation in Detroit in 2000), and there wasn't much torque steer. Power was (obviously) better than the normally-aspirated PT, but I'm so used to my 300+hp Talon that I was wanting more! I'm sure aftermarket goodies will help. The PT Turbo requires at least 91 octane.
More to come!
EST